
UPDATE (2/5/2020): Updated new imagery, branding, and added new references for getting started with Adobe Acrobat Sign and InDesign.
It is amazing how forms exist everywhere. When I go to the doctor, when I sign up for an event, or when I go to the DMV, there are always forms to fill out and sign. When I went to college, Student Services had a dedicated wall for all of the possible forms you could need. It was a quarterly ritual to see students with handfuls of forms running up and down hallways getting signatures from professors, advisers, etc. Even today, we all have stories like that.
Recently, I was helping a customer turn their static PDFs into interactive forms on their website using Adobe Acrobat Sign and Adobe Acrobat, both part of Adobe Document Cloud. That way, their users could go right to their website, fill out forms, and submit it automatically. No printers involved.
All of their forms were designed by their creative team in Adobe InDesign. One of the challenges they ran into was when it came time to update these forms, it would take weeks for them to re-tag documents that came from the designers, which is expensive and very time-consuming.
To make this easier, we thought, what if we built form fields directly into the design layouts that were being created in Adobe InDesign? That way, any design updates would already have all of the interactivity for Adobe Acrobat Sign already setup.
Before we start, I have to note this isn’t the only way you can create your forms. You can use Adobe Acrobat, Microsoft Word, and all sorts of other tools simply by using text tags. This is helpful, though, when you have a lot of forms created by your designers in Adobe InDesign.
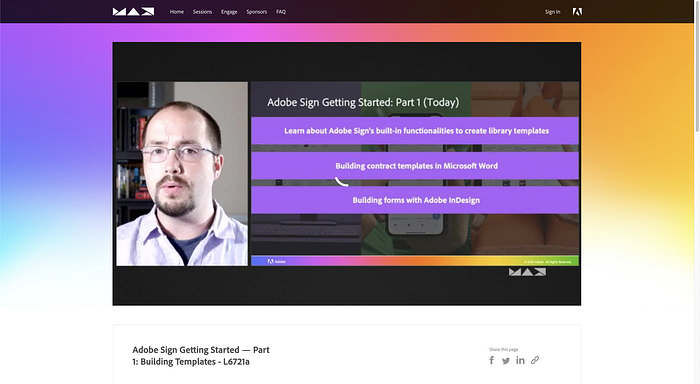
Also before we start, if you are a video learner, have a look at the Adobe Acrobat Sign Getting Started — Part 1: Building Templates — L6721a from Adobe MAX 2020 where I walk through some of the different ways that you can tag for Adobe Acrobat Sign, including InDesign.
Prerequisites
- Adobe InDesign
- Adobe Acrobat Sign Business or Enterprise*
*You can still use forms created in InDesign with any Adobe Acrobat Sign subscription, but Web Forms (i.e. embedding on a website) explained below requires Business or Enterprise licensing.
Step 1: Understanding Text Tags
The first thing you need to learn for setting up Adobe Acrobat Sign interactivity in your Adobe InDesign files is to learn about Text Tags. Text Tags are specially formatted pieces of text that can be placed anywhere within the content of your document to specify the location, size, and type of fields recognized by Adobe Acrobat Sign. They can be used within file formats like Word, PDF, and other formats supported by Adobe Acrobat Sign. For PDF and InDesign documents, you can place these as part of your PDF Interactive form fields.
In InDesign, you can create interactive PDF fields directly in your layout, whether you are creating a PDF form or wanting to use it with Adobe Acrobat Sign forms.
When you read the Adobe Acrobat Sign Text Tags documentation, you’ll see examples like {{Sig_es_:signer1:signature}}. Here is how to interpret that:
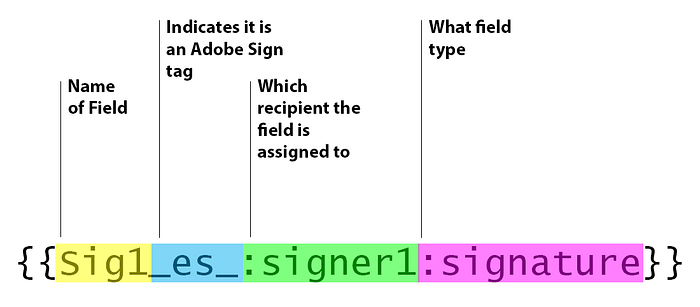
The examples with curly brackets are shown for when you are embedding fields in text documents, like Word documents. When you are using text tags with PDF form fields as we do in this exercise, you can ignore the curly brackets. The important thing you need is the text inside of the curly brackets for your field names.

Step 2: Using interactive forms in Adobe InDesign
As part of this guide, we are going to work with an InDesign form that you can download here.
In this document, we have a variety of different fields that we will walk through, including:
- Name
- Phone
- Gender
- Signature
- Signing date
Customer name field
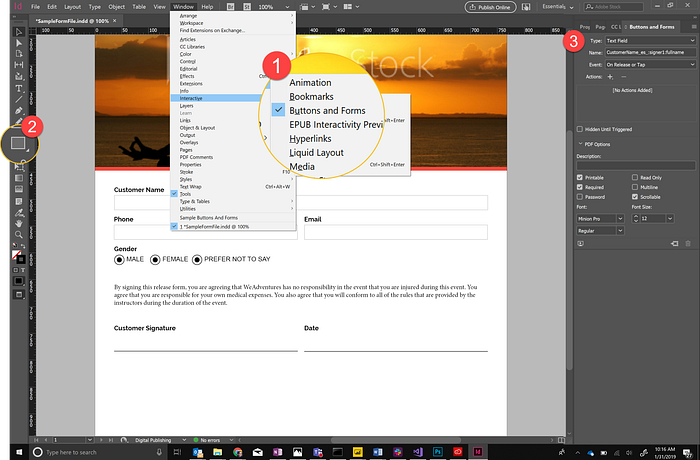
- Go to Window > Interactive > Buttons and Forms to open the Buttons and Forms palette.
- Using the Rectangle tool, draw a Rectangle within the Customer Name field area.
- With the new rectangle selected, in the Buttons and Forms palette, set the following settings:
- Type: Text Field
- Name: CustomerName_es_:signer1:fullname
- Event: On Release or Tap
The field is created. Now when you export the document as an Interactive PDF, this field will show up on the PDF and when you import it into Adobe Acrobat Sign.
Get Ben Vanderberg’s stories in your inbox
Join Medium for free to get updates from this writer.
Remember me for faster sign in
Next, repeat the process for the Customer Name field with the other fields in the InDesign layout. Here are the recommended Buttons and Forms settings for each:
Phone field
- Type: Text Field
- Name: Phone_es_:signer1:phone
- Event: On Release or Tap
Email field
- Type: Text Field
- Name: Email_es_:signer1:email
- Event: On Release or Tap
Signature field
- Type: Text Field
- Name: Sig_es_:signer1:signature
- Event: On Release or Tap
Signature date field
- Type: Text Field
- Name: Date_es_:signer1:date
- Event: On Release or Tap
Gender radio button field
The Gender radio button has a slightly different process from the other text fields because we are creating options to select from.
- Using the Ellipse tool and holding shift, create an ellipse for your radio button.
- Select the ellipse.
- Set the following settings in the Buttons and Forms palette:
- Type: Radio Button
- Name: Gender_es_:signer1
- Event: On Release or Tap
- Button Value: Male
For any of the subsequent options, such as Female, Prefer Not to Say, etc., you may copy and paste the ellipse you created. Then, change the Button Value in Buttons and Forms to match the appropriate value.
Step 3: Export your form to PDF
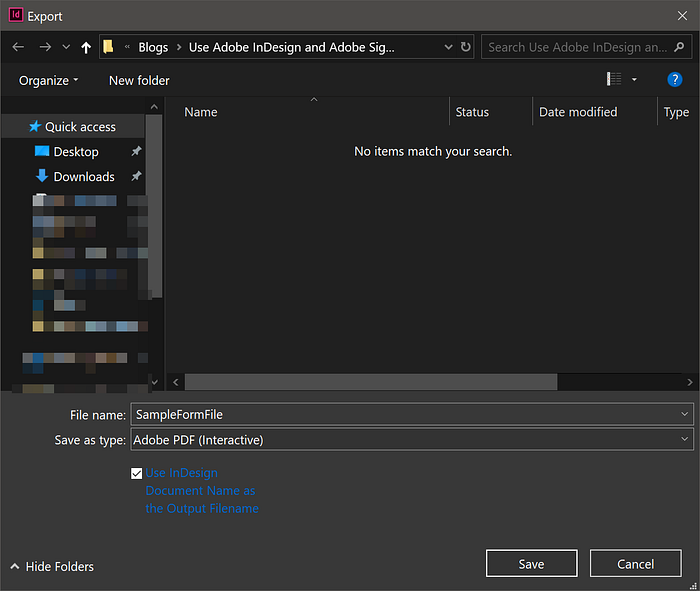
Now that you have created all of your fields in your document, you will need to export this file as an Interactive PDF.
- Go to File > Export.
- Under Format, select Adobe PDF (Interactive).
- Click Save.
- In the next dialog, click Export.
Step 4: Upload to Adobe Acrobat Sign as a Web Form
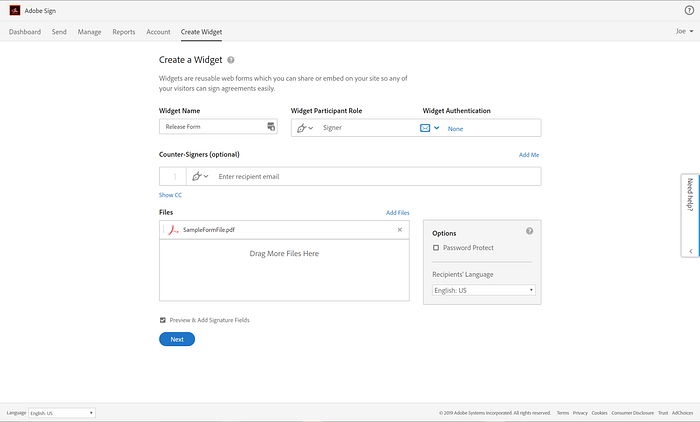
Once your PDF is saved, you can now turn it into a web form.
- Log in to your Adobe Acrobat Sign Business or Enterprise account.Note: For more information about the different subscription levels, see here. Click links here if you need a Trial or Developer account.
- On your dashboard, select Create Web Form.
- Upload your PDF file where it asks and give the web form a name.
- Click Preview and Position Fields.
- Click Next.
Here, you will see that your fields have been recognized by Adobe Acrobat Sign. You can adjust the fields if needed.
If everything looks good, click Send.
Now you have a URL or embed code you can place on your website and link to. Users can fill the form and not have to worry about finding a paper copy or downloading and printing a document.
BONUS: Use Creative Cloud libraries to standardize your form fields

If you are designing a lot of forms with the same types of fields, or if you are working as a team and need to standardize forms and form fields, consider using Creative Cloud libraries. They allow you to create a library of your field elements that can be shared with your team. This saves you time adding fields to layouts and makes form fields consistent.
- Open Adobe InDesign.
- Open Window > CC Libraries
- Click on the drop-down list and select Create New Library…
- Name your new library and click Create. E.g. Form Fields
- Select the field and related items (like label, etc.) in your layout.
- Click the + sign and select Graphic.
Your form field is now added to your CC Libraries. Now, if you are creating a new form in InDesign, you don’t have to worry about rebuilding form fields repeatedly; simply drag and drop from CC Libraries. This is also a benefit if you are using reports or merging data in Adobe Acrobat Sign. This also means that across all documents, fields will have the same names.
Resources
Adobe Sign Text Tag Guide
When using text tags in an editable document, Adobe Sign overlays a rectangle covering the entire span of the text tag…
helpx.adobe.com
Create a web form
A signable web form can be created to embed on your website (or send as a web link), allowing multiple people to easily…
helpx.adobe.com
Work with forms in InDesign
Using InDesign you can create simple forms within InDesign, without needing to touch up the PDF document in Acrobat…
helpx.adobe.com
Create forms using Acrobat DC
Adobe Sign text tags can be used in conjunction with Acrobat form fields to define the specific properties of a field…
helpx.adobe.com
Use Creative Cloud Libraries in InDesign to share and organize design assets
Adobe Creative Cloud Libraries allow you and your colleagues to collect and organize all of your design assets from…
helpx.adobe.com
Adobe Sign Getting Started - Part 1: Building Templates
Join this lab to learn about Adobe Sign’s built-in functionalities to create intelligent forms and discover best…
Follow the Adobe Tech Blog for more developer stories and resources, and check out Adobe Developers on Twitter for the latest news and developer products.